Customizer radio image control
In this tutorial, I’ll be writing about a radio image control for the WordPress customizer. This was a request, but I honestly don’t remember who asked for it. Sorry for forgetting. I hope you’re following the blog. :)
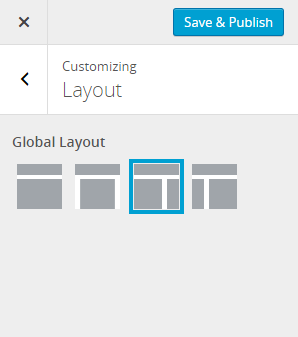
This type of control is also something I’ve needed for a long while. It’s now being used in the revamped layout setting in the Hybrid Core framework.
Basically, a radio image control replaces your standard <input type="radio" /> fields with selectable images. So, it’s pretty cool for things like selecting a layout or any other setting where it’d be nice to have a visual representation of the option.
Like other advanced customizer tutorials, I’ll be moving through this fast and not explaining each detail. You need to be at least somewhat familiar with building settings in the customizer before moving forward.
Building the radio image control class
The first thing we need to do is build a custom control class that extends WP_Customize_Class. So, create a new file called control-radio-image.php in your theme’s /customize folder (or whatever structure you prefer) and place the following code into it.
Fair warning for those of you studying the code: you may be used to seeing a render_content() method in custom control classes. I opted to go with a JS template via the content_template() method. See core ticket #30738 for the main reason why. Admittedly, I’m a bit out of my element working with JS templates, but the best way to learn is to simply do and to teach others by writing about it. Feel free to correct anything I screw up.
<?php

/**
 * Radio image customize control.
 *
 * @since  1.0.0
 * @access public
 */
class JT_Customize_Control_Radio_Image extends WP_Customize_Control {

	/**
	 * The type of customize control being rendered.
	 *
	 * @since  1.0.0
	 * @access public
	 * @var    string
	 */
	public $type = 'radio-image';

	/**
	 * Loads the jQuery UI Button script and custom scripts/styles.
	 *
	 * @since  1.0.0
	 * @access public
	 * @return void
	 */
	public function enqueue() {
		wp_enqueue_script( 'jquery-ui-button'          );
		wp_enqueue_script( 'jt-customize-controls', get_template_directory_uri() . '/js/customize-controls.js', array( 'jquery' ) );
		wp_enqueue_style(  'jt-customize-controls', get_template_directory_uri() . '/css/customize-controls.css'                  );
	}

	/**
	 * Add custom JSON parameters to use in the JS template.
	 *
	 * @since  1.0.0
	 * @access public
	 * @return void
	 */
	public function to_json() {
		parent::to_json();

		// We need to make sure we have the correct image URL.
		foreach ( $this->choices as $value => $args )
			$this->choices[ $value ]['url'] = esc_url( sprintf( $args['url'], get_template_directory_uri(), get_stylesheet_directory_uri() ) );

		$this->json['choices'] = $this->choices;
		$this->json['link']    = $this->get_link();
		$this->json['value']   = $this->value();
		$this->json['id']      = $this->id;
	}

	/**
	 * Underscore JS template to handle the control's output.
	 *
	 * @since  1.0.0
	 * @access public
	 * @return void
	 */
	public function content_template() { ?>

		<# if ( ! data.choices ) {
			return;
		} #>

		<# if ( data.label ) { #>
			<span class="customize-control-title">{{ data.label }}</span>
		<# } #>

		<# if ( data.description ) { #>
			<span class="description customize-control-description">{{{ data.description }}}</span>
		<# } #>

		<div class="buttonset">

			<# for ( key in data.choices ) { #>

				<input type="radio" value="{{ key }}" name="_customize-{{ data.type }}-{{ data.id }}" id="{{ data.id }}-{{ key }}" {{{ data.link }}} <# if ( key === data.value ) { #> checked="checked" <# } #> />

				<label for="{{ data.id }}-{{ key }}">
					<span class="screen-reader-text">{{ data.choices[ key ]['label'] }}</span>
					<img src="{{ data.choices[ key ]['url'] }}" alt="{{ data.choices[ key ]['label'] }}" />
				</label>
			<# } #>

		</div><!-- .buttonset -->
	<?php }
}
Loading scripts and styles
In the class above, you probably noticed that I enqueued a few scripts and styles. The jQuery UI buttonset() is the primary script that handles replacing the radio inputs with images. It’s included with WP, so we merely need to load it.
We also need a custom JS script to apply the buttonset() to our radio inputs and to handle the customizer setting when it changes. Place the following code in your theme’s /js/customize-controls.js file:
jQuery( document ).ready( function() {

	// Use buttonset() for radio images.
	jQuery( '.customize-control-radio-image .buttonset' ).buttonset();

	// Handles setting the new value in the customizer.
	jQuery( '.customize-control-radio-image input:radio' ).change(
		function() {

			// Get the name of the setting.
			var setting = jQuery( this ).attr( 'data-customize-setting-link' );

			// Get the value of the currently-checked radio input.
			var image = jQuery( this ).val();

			// Set the new value.
			wp.customize( setting, function( obj ) {

				obj.set( image );
			} );
		}
	);

} ); // jQuery( document ).ready
And, we need a little bit of custom CSS to handle styling the control. Place the following code in your theme’s /css/customize-controls.css file.
.customize-control-radio-image .ui-button {
	margin:        0;
	border-radius: 0;
	border:        none;
	background:    transparent;
}

.customize-control-radio-image .ui-button-text { padding: 0; }

.customize-control-radio-image img {
	box-sizing: border-box;
	max-width:  100%;
	height:     auto;
	padding:    1px;
	border:     4px solid transparent;
}

	.customize-control-radio-image img:hover,
	.customize-control-radio-image img:focus {
		border-color: #ddd;
	}

	.customize-control-radio-image .ui-state-active img {
		border-color: #00a0d2;
	}
Actually using the radio input control
OK, so you’ve got everything in place now. Awesome. Yeah, there’s a bit of setup, but it’s pretty fun to play around with this thing.
At this point, you just have a final step before doing cool stuff.
The following code is an example of using the custom control to output a layout setting with images that represent the various layouts. Note that you’ll actually need to replace the image URLs in the code with something relevant to your theme.
add_action( 'customize_register', 'jt_customize_register' );

function jt_customize_register( $wp_customize ) {

	// Load the radio image control class.
	require_once( trailingslashit( get_template_directory() ) . 'customize/control-radio-image.php' );

	// Register the radio image control class as a JS control type.
	$wp_customize->register_control_type( 'JT_Customize_Control_Radio_Image' );

	// Add a custom layout section.
	$wp_customize->add_section( 'layout', array( 'title' => esc_html__( 'Layout', 'jt' ) ) );

	// Add the layout setting.
	$wp_customize->add_setting(
		'layout',
		array(
			'default'           => 'content-sidebar',
			'sanitize_callback' => 'sanitize_key',
		)
	);

	// Add the layout control.
	$wp_customize->add_control(
		new JT_Customize_Control_Radio_Image(
			$wp_customize,
			'layout',
			array(
				'label'    => esc_html__( 'Layout', 'jt' ),
				'section'  => 'layout',
				'choices'  => array(
					'content-sidebar' => array(
						'label' => esc_html__( 'Content / Sidebar', 'jt' ),
						'url'   => '%s/images/content-sidebar.png'
					),
					'sidebar-content' => array(
						'label' => esc_html__( 'Sidebar / Content', 'jt' ),
						'url'   => '%s/images/sidebar-content.png'
					),
					'content' => array(
						'label' => esc_html__( 'Content - One Column', 'jt' ),
						'url'   => '%s/images/content.png'
					)
				)
			)
		)
	);
}