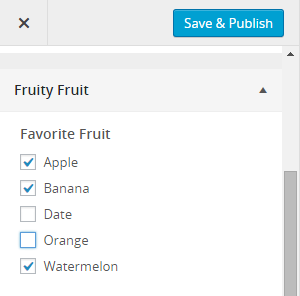
Multiple checkbox customizer control

This post is part of my ongoing series of helping theme authors out with building customizer fields that they need help with. This request comes from Nilambar Sharma.
The specific request was, “Have you developed customizer control for multi checkbox. Say five choices are given and user can select multiple items from there?”
The closest I’ve seen to this is the Multiple Category Control from Theme Foundation. I sat down at the drawing board and got to work on a what I think is a good solution for any set of data using a similar method.
This tutorial will assume that you’re accustomed to working with the Customization API in WordPress core.
Building the control class
Create a new file called control-checkbox-multiple.php. As far as this tutorial is concerned, it’s sitting in the theme root folder. Feel free to put it in a sub-folder and organize how you see fit. Drop the following code into the file.
/**
 * Multiple checkbox customize control class.
 *
 * @since  1.0.0
 * @access public
 */
class JT_Customize_Control_Checkbox_Multiple extends WP_Customize_Control {

	/**
	 * The type of customize control being rendered.
	 *
	 * @since  1.0.0
	 * @access public
	 * @var    string
	 */
	public $type = 'checkbox-multiple';

	/**
	 * Enqueue scripts/styles.
	 *
	 * @since  1.0.0
	 * @access public
	 * @return void
	 */
	public function enqueue() {
		wp_enqueue_script( 'jt-customize-controls', trailingslashit( get_template_directory_uri() ) . 'customize-controls.js', array( 'jquery' ) );
	}

	/**
	 * Displays the control content.
	 *
	 * @since  1.0.0
	 * @access public
	 * @return void
	 */
	public function render_content() {

		if ( empty( $this->choices ) )
			return; ?>

		<?php if ( !empty( $this->label ) ) : ?>
			<span class="customize-control-title"><?php echo esc_html( $this->label ); ?></span>
		<?php endif; ?>

		<?php if ( !empty( $this->description ) ) : ?>
			<span class="description customize-control-description"><?php echo $this->description; ?></span>
		<?php endif; ?>

		<?php $multi_values = !is_array( $this->value() ) ? explode( ',', $this->value() ) : $this->value(); ?>

		<ul>
			<?php foreach ( $this->choices as $value => $label ) : ?>

				<li>
					<label>
						<input type="checkbox" value="<?php echo esc_attr( $value ); ?>" <?php checked( in_array( $value, $multi_values ) ); ?> />
						<?php echo esc_html( $label ); ?>
					</label>
				</li>

			<?php endforeach; ?>
		</ul>

		<input type="hidden" <?php $this->link(); ?> value="<?php echo esc_attr( implode( ',', $multi_values ) ); ?>" />
	<?php }
}
There’s a couple of things to note about this class. The first is that I’m utilizing the enqueue() method. If you’re unfamiliar with this control method, it allows you to enqueue scripts/styles when a specific control is used. We’ll be loading a custom customize-controls.js file for this control.
The next thing of note is that there’s a hidden <input> element, which we’ve added the standard $this->link() output to. We’ll be dynamically adding the checkbox input values to this hidden input via JavaScript so that it works with the customizer.
Loading the control class
Assuming you’ve never loaded a control class, you might be surprised if you attempt to simply load the file in your theme. You’ll get a fatal error because the WP_Customize_Control class hasn’t been defined yet.
What I recommend is loading custom control classes early on the customize_register hook like so in your theme’s functions.php file:
add_action( 'customize_register', 'jt_load_customize_controls', 0 );

function jt_load_customize_controls() {

	require_once( trailingslashit( get_template_directory() ) . 'control-checkbox-multiple.php` );
}
Adding the JavaScript
In the class, we enqueued the customize-controls.js script, so we need to have that file in the theme. In that file, drop this code:
jQuery( document ).ready( function() {

	/* === Checkbox Multiple Control === */

	jQuery( '.customize-control-checkbox-multiple input[type="checkbox"]' ).on(
		'change',
		function() {

			checkbox_values = jQuery( this ).parents( '.customize-control' ).find( 'input[type="checkbox"]:checked' ).map(
				function() {
					return this.value;
				}
			).get().join( ',' );

			jQuery( this ).parents( '.customize-control' ).find( 'input[type="hidden"]' ).val( checkbox_values ).trigger( 'change' );
		}
	);

} ); // jQuery( document ).ready
This bit of jQuery looks to see when a checkbox value has changed. If it has, it adds/removes that value to the hidden input. It also let’s WP know that a setting has changed via .trigger( 'change' ), so that the customizer form can be saved.
Admittedly, I’m not the greatest JS programmer, so please improve upon the code if possible.
Creating the customizer option
This is pretty standard for anyone who’s used the customizer. You need to add a setting and a control. You can use a multiple checkbox control for all sorts of things, such as choosing multiple categories or multiple pages. For the sake of this example, I’ll just have a “favorite fruit” setting to show how things work.
add_action( 'customize_register', 'jt_customize_register' );

function jt_customize_register( $wp_customize ) {

	$wp_customize->add_setting(
		'favorite_fruit',
		array(
			'default'           => array( 'apple', 'orange' ),
			'sanitize_callback' => 'jt_sanitize_favorite_fruit'
		)
	);

	$wp_customize->add_control(
		new JT_Customize_Control_Checkbox_Multiple(
			$wp_customize,
			'favorite_fruit',
			array(
				'section' => 'title_tagline',
				'label'   => __( 'Favorite Fruit', 'jt' ),
				'choices' => array(
					'apple'      => __( 'Apple',      'jt' ),
					'banana'     => __( 'Banana',     'jt' ),
					'date'       => __( 'Date',       'jt' ),
					'orange'     => __( 'Orange',     'jt' ),
					'watermelon' => __( 'Watermelon', 'jt' )
				)
			)
		)
	);
}
Sanitizing the data
Because we’re working with multiple values, you can’t simply throw in just any ol’ sanitizing function for the sanitize_callback argument. You’ll need a custom callback function to sanitize the values individually.
Another thing to keep in mind is that because we used a hidden input element in our control, everything is stored as a comma-delineated string of values rather than array. So, we’ll need to turn that back into an array before the value is saved to the database.
We can kill two birds with one stone with a custom sanitize_callback function.
function jt_sanitize_favorite_fruit( $values ) {

    $multi_values = !is_array( $values ) ? explode( ',', $values ) : $values;

    return !empty( $multi_values ) ? array_map( 'sanitize_text_field', $multi_values ) : array();
}
I’ve used array_map() in the function to run sanitize_text_field() over each value. Don’t just use that because I used it in this tutorial. Use the function most appropriate for the type of data that you’re sanitizing.